This new Skin Rehab series documents my experience and results using in-office treatments to level up my skin game, as well as explaining the science behind the treatment method and comparing the cost, convenience and results to the at home options.
I’d like to tell you guys about what events led me to see some specialists recently in the hopes of getting professional treatment, and the schedule I decided on for getting my skin back in tip top shape.
What led to me seeing skin specialists
Recently I’ve been having really great luck with my skin – specifically, my acne is on the down low and my overall hydration levels are great. But it’s far from perfect. I feel like I really need a good kick-start with stronger treatments than what I can do myself at home to straighten out these lingering issues. My ‘ideal skin’ would be glowier with less flakiness and fine lines, slowed ageing and be finally free from acne and the resulting PIE for good.
With having some spare cash thanks to working overtime over the past month, a university winter break approaching (meaning minimal sun exposure, and more importantly minimal social exposure), and finally pretty-ok skin that they wouldn’t have to tip toe around to avoid angering, I decided to take the plunge and go to a skin clinic for an assessment and look at bringing out the big guns – professional in-office treatments (I know when it’s time to see a professional). I already knew that I was really interested in receiving laser sessions (because lasers are so cool!), but I also wanted to have UV photographs taken of my skin. My partner’s mum recommended a clinic that did both of these and more near my work, so I decided to take the plunge!
The consultation: skin type and routine
When I went into the glossy, white clinic for my consultation about a month ago, my nurse and I sat down and first discussed my routine and skin type. I explained to her that I had very oily skin, which is combination in areas, and very prone to dehydration and sensitivity. Thankfully we agreed that my routine was already extensive and covering all my bases, except for daily Vitamin B and C which I’ve since incorporated (more on that in a future post). We then moved onto discussing what bothered me most about my skin and what I would want from any treatment program. I settled on 1) acne elimination/textural improvement, 2) redness reduction and 3) anti-ageing as my main concerns. She mentioned that most of my acne is congestive/irritated acne. It’s not hormonal or cystic or pustular, but rather the large pores and oily skin cause blockages that lead to a bit of inflammation and bumpy, red texture.
Photographs
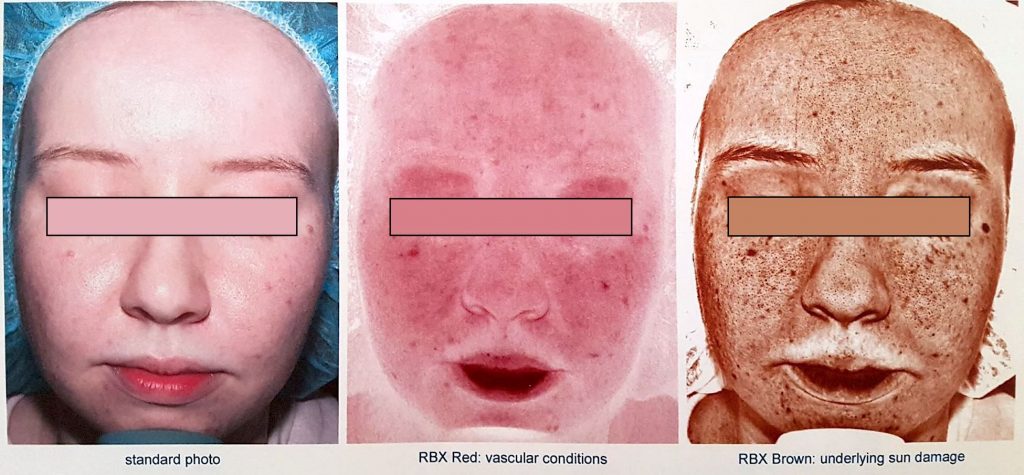
After getting an idea of my skin history and issues, we moved onto the photographs that would be used to create a baseline for future comparison of my skin’s improvement. These special photographs use a certain flash that highlights below the surface of the skin to show underlying redness and capillaries, and another to show UV damage that has yet to progress to the surface.
Now, guys, I’m fully aware that my skin is not perfect. But boy was I shocked by the photographs!
Vascular conditions
I’m a naturally rosy person because of my susceptibility to irritation and dehydration. The vascular photos really highlighted my problem areas and shocked me with the severity of redness on my eyelids, which suffer from eczema, and my cheeks/nose area, as well as showing the damage I’d done by picking at acne.
Underlying sun damage
The UV photographs made me realise how much irritation and redness from picking at my skin really causes pigmentation underneath the skin – notice the alignment of the dark red areas in the vascular photo and the pigment that it’s left behind in the UV photo.
I have been very protected from the sun my entire life and worn sunscreen daily since the age of 18 or so. So seeing the extensive freckling and darkness underneath my practically pigment-less skin took my breath away.
We also discovered that the area of relatively pale and calm skin above my upper lip is in fact an area of vitiligo. You can see the bright white area caused by a condition that inhibits your ability to produce melanin (pigment) in patches. I am naturally so fair that it’s almost invisible, but when you look at the underlying melanin it stands out quite clearly as being different. I need to take special care of this area in the sun to prevent skin damage and the vitiligo spreading.
This photograph also showed me where to focus more sunscreen daily, and brought even further attention to my very large pores which are to thank for my oily skin and rough texture.
Now, prepare yourself for the photos (excuse the censorship):
Goals
After seeing these ~rough~ photos, my two new goals of reducing irritation and pigmentation were added to the list. This solidified my final goals as:
Acne elimination
Pore and textural improvement
Redness/irritation reduction
Sun damage reversal
Anti-ageing/prevention/fun with lasers
My Skin Rehab treatment plan
With these goals in mind, my nurse suggested some treatments which funnily were the ones I had thought about trying myself. First on my treatment plan is a HydraFacial (for exfoliation and skin prep), followed by some sessions of Omnilux LED treatments (for acne and ageing) and Laser Genesis (for pigmentation and texture) – all of which I’ll discuss in part 1, 2 and 3 of this series – coming soon!).
And that was my experience leading up to and during my consultation for my upcoming ‘Skin Rehab’ over the winter. I’m really excited to see how great I can get my skin over the next few months with a little professional help after all these years of acne and dehydration. Look forward to seeing the before and after photos in the final instalment!
My first foray into the world of professional skin treatments is documented here in Part 1 – all about my Hydrafacial experience; how it works, what to expect, and whether I recommend it.




[…] as part of my skin “rehab” journey to achieve better skin with professional treatments, I learned about and experienced an LED light […]
[…] post is part of my Skin Rehab Series – check out the other posts […]