I take a lot of photos of my skin. More than is probably normal.
Mostly, It’s because I run this blog – like when I took photos to demonstrate the results of my botox treatments. But I’m also just obsessive about documenting results. I’ve been documenting my skin troubles with amateur photos for years, and even managed to catch a fungal acne breakout on camera. With my terrible memory and the complexities and objectiveness of what makes skin look “good”, before-and-after photos are the only way to really see what’s changed over time.
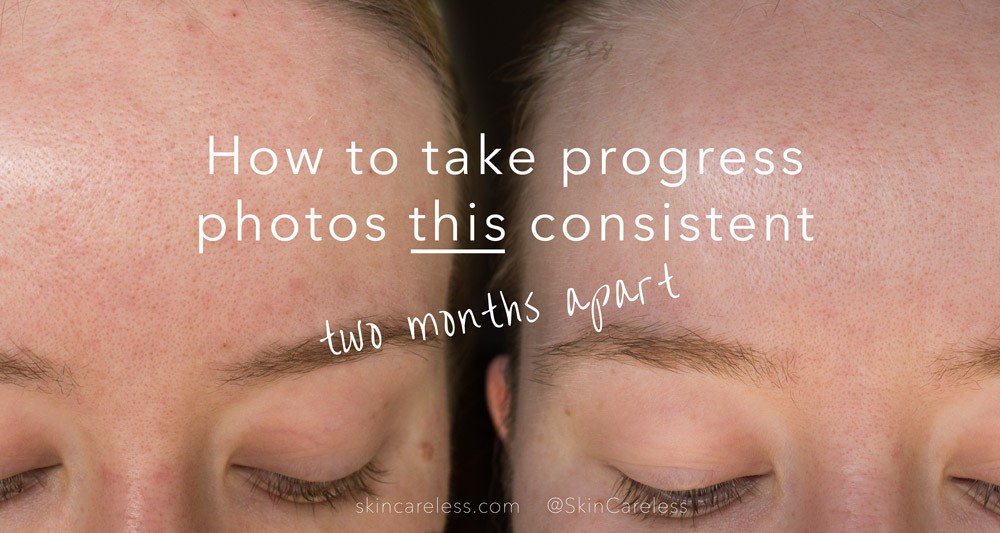
Lately, I’ve been working hard on a huge post all about Intense Pulsed Light and my results from at-home IPL treatments. The post centres around some really high-quality photos tracking the results of me using the device over two months. They’re picture-perfect and the best “before-and-after”s I’ve ever taken. And getting those photos wasn’t easy – I’m talking bad lighting, weird angles, and out-of-focus shots. It took a few tries, but I finally nailed the formula for perfect before-and-after skin shots. Let me share with you what I learned about getting photos that really represent your skin well for the best comparison possible.
Why you might want to take photos of your skin
First, let’s chat a little about why you should care about snapping pristine skin shots in the first place.
For the reasons mentioned above, you can’t trust your mind’s eye to remember all the little details about your skin over long periods of time. And that’s a problem when it comes to tracking ageing, acne and product or treatment reactions.
Ageing
Personally, I want to have consistent series of photos to look back on as I age of my skin to notice changes long-term and to see where my weaknesses are.
Product or treatment results
Another good reason to take regular photos of your skin is to accompany a skin diary for tracking your routine. I note my current products down every month to keep track of subtle or big changes I make to products or techniques. Then, I can use the photos I take of my skin to support little experiments and reflections on what my skin may like or not like. You never know when you’re going to have a reaction and need to look back and see what you’ve used and if you’ve ever reacted similarly before.
And of course, good before-and-after photos are the best way to show unbiased results of a specific product/treatment. It’ll help when deciding whether you want to keep spending the money on a certain treatment in the future based off your personal results.
Acne
Finally, photos are especially helpful to see fluctuations in acne. If you’re undergoing acne treatment with a doctor or at home yourself, it really helps to see if and how you’re improving. You can note changes to location and severity of your breakouts and notice any trends that pop up, like monthly breakouts or certain lifestyle changes that influence your skin.
How to get the perfect before-and-after pictures of your skin
Now you’re convinced you should be taking good, regular photos of your face, it’s time to learn how.
The best photos are ones that focus to the following:
- quality
- consistency
- organisation
It’s all about getting the same high-quality shot week-to-week and month-to-month. That lets you compare your skin without any extraneous variables.
Quality
Good quality camera and settings
We now live in an age where almost any camera you can get your hands on is high-quality. A new-ish phone camera or mirrorless or DSLR camera is fine. Don’t use the selfie mode on a phone camera though – the quality is a lot lower than the main back camera.
Have your camera settings adjusted if possible. Pick a certain, consistent zoom amount to avoid warping. I choose 1.5x zoom on my phone camera, as this eliminates the big-nose fish-eye effect you can sometimes otherwise get. If you can, adjust the shot to have a high aperture number (f-Stop) to allow a wide depth of field, which equals no blurry bits. Set a fast shutter speed to avoid motion blur. A low ISO will avoid graininess. All this together mean a crisp shot – but unfortunately one that might come out dark, so you need to also be conscious of the lighting.
Even lighting
Sitting by a brightly lit window, front on, will give you the best chance of even, good lighting. Light varies so much from bulb to bulb, but sunlight is a lot more consistent. Make sure you’re not directly in the path of the sun though, as the shadows and glare will cause you problems. Try to stay away from overhead lights for the same reason.
Consistency
Time of day & location
This tip pairs up with lighting mentioned above. Consistency in when and where you take the photo is essential to ensure that it’s exactly the same between comparisons. That means choose a location and stick to it! Even more so, consider the sunlight hours where you live and in which season you’re in and adjust the time throughout the year to keep it consistent – i.e. take your photos one hour after sunrise.
Angles and framing
The relationship between the camera and your face can greatly influence your features, and if done wrong, an make lining up before-and-after photos a nightmare. Try to pick a landmark to face your head towards for each angle, and decide on a certain place to set or hold the camera up to the same every way for every shot and each session.
Facial expression
You can do whatever face you’d like, but I personally go for the “passport photo” expression. That means no smile and definitely no teeth, but just a little bit of extra awakeness in the eyes and a slight stretch of the mouth to avoid looking totally murderous. This pose is perfect because it’s easy to replicate exactly the same way every time.
Crop
In your phone or on your laptop after the fact is where you fix and mild angle issues in your photo, and crop it to the same place, so if you flick back and forth between old and new shots your features align nicely. It’s easiest to crop so that the edges of your face touch the frame for consistency.
Editing
Though the photos should be similar to any previous shoots you’ve taken if you choose the lighting well, there will always be a bit of difference from day to day. It’s important to adjust the colour balance to match from photo to photo, as it can drastically change how red your skin appears. That means warmth (blue vs red) and tint (green vs purple) need to be balanced. I use Lightroom, but any built-in photo editing software will do. There’s often a tool to select a neutral grey part of your images and it’ll set the right white balance for you. Then, make sure your exposure (brightness) is equal.
Organisation
There’s nothing worse than taking hundreds of photos and having to sort through them later, once you’ve forgotten when you took them and why. Always stay organised as soon as possible to get the most out of your progress shots.
Sorting & selection
Sift through the photos you’ve taken and delete blurry photos or duplicates straight away. Don’t be lazy and leave it until another day!
Order of photos
Try to take photos in the same order to make looking at comparisons easier. I personally start with a full face front-on, then each side, then my forehead, then nose, then mouth. That way, I always known what to expect when looking at the photos later.
Labeling
When exporting photos from your camera or backing them up to the cloud via your phone, make sure to label the photos and folder with the date.
More tips for how to get the most out of your before-and-after pictures
Take photos often
Though it’s understandable, try not to take photos just when your skin looks very bad or very good. otherwise you’ll have a biased sample of photos, and won’t be able to see your skin on an average day, which is the most important comparison to have. Once a week seems to be the sweet spot.
Display thoughtfully
When it’s finally time to compare photos, my personal favourite method is to use the preview function (single-clicking an image in a folder and pressing spacebar on my Mac) then flick between photos with the arrow keys. This brings the most attention to differences in your skin. If that’s not possible, simply aligning the photos side by side and flicking your eyes back and forth is perfectly good too.
Can’t seem to ever get the photos just right?
If you really never have success replicating the same photo more than once – or just can’t be bothered – consider asking your local dermatologists office for a consultation. They’ll usually document your skin under specific light conditions and be able to get really high-quality results with a purpose-built machine.


[…] Take good progress photos – once you start seeing progress, it becomes exhilarating. it’s like a competition with yourself. Can your skin look better than it did a month ago? […]