Ever since first getting a Hydrafacial, I’ve been really drawn to the idea of recreating the technique at home. After all, I know a thing or two about skin care, and from what I gathered in my experience and research, a Hydrafacial is really just a combination of a few skin care processes that aren’t risky or even very difficult to do on yourself! And the resulting glowy, silky-soft skin is hard to pass up.
So, off I went to experiment on my own face so you didn’t have to. And I’m back with the results: I’ve nailed the formula for a DIY at-home Hydrafacial-inspired treatment that rivals the real thing. And I’m giving you the secret today.
What’s so special about the Hydrafacial?
Despite their marketing (tagline: “Not a facial.”), the Hydrafacial is kind of a facial.
It toes the line between a spa facial, which is usually a surface-level, temporary skin conditioning treatment for relaxation, and a procedure, which is a more effective and targeted approach using active ingredients, lasers or other fun things.
More specifically, a Hydrafacial is a branded version of a hydrabrasion treatment. You may have heard of its closely-related cousin dermabrasion before. ‘Derm’ means skin and ‘abrasion’ is to scrub or wear away at. So it’s not hard to figure out that dermabrasion is a session of strong, physical exfoliation. Hydrabrasion is the same, except it centers around using water and chemical products to assist the exfoliation process while increasing hydration levels.
The Hydrafacial company has patented a special vacuum tool that simultaneously spits out and sucks up water in a vortex-like fashion, and uses a cartridge system to infuse the water as needed to do different things to your skin, like chemically exfoliate and hydrate. Picture it as taking your skin through the platinum car wash and getting the most thorough clean of your life. If you want to read all about what a real Hydrafacial is and feels like, come with me as I narrated step-by-step my first-time experience.
Can you do a Hydrafacial on yourself at home?
Now, that all sounds a little too fancy, and like we might not be able to replicate it at home. But luckily, in my opinion most of it is a marketing gimmick or a frivolous step. The real driving force behind the Hydrafacial’s power is the intense physical exfoliation that the rough tip of the vacuum head provides as it’s moved across the skin. This done repetitively, combined with the light chemical exfoliation in their cleansing liquids, creates the results. And we can recreate that effect pretty easily ourselves at-home.
What can you expect from your at-home “Hydrafacial”?
If you haven’t been living under a rock in the last two years, you probably came across the ‘glass skin’ fad. The image is that of glossy-looking, taut and poreless skin. The results from an at-home or professional Hydrafacial-esque treatment is about as close and you’re going to get to that in your lifetime.
The combination of exfoliation to smooth out the skin and the focus on lots and lots of hydration plumps + dews your skin up like nothing else! You’ll also be less flaky, so your makeup will look smoother.
When to do an at-home Hydrafacial
This treatment is perfect for those with stubborn congestion or mild-moderate acne. The chemical exfoliants also help to speed the healing of post-inflammatory hyperpigmentation. Try it out when your skin is looking a little dull and lacklustre.
You’ll want to keep this process to a semi-frequent basis. Too much and you’ll seriously piss your skin off, but too little and you’ll let your skin cells build up and dry out back to square one. I find that this technique or a variation thereof suits me best between once a week to once a month.
The best time to do the at-home Hydrafacial is one or two days before a big event, especially where you’ll be photographed. You’ll have time to chill any redness down if you experience that reaction, but you’ll also reap the benefits of freshly-exfoliated skin which looks AMAZING under makeup and in photos! So grab your products, tie back your hair, and let’s get into it!
Disclaimer
This is an intense treatment. Do not perform it on severely damaged or inflamed skin. I strongly recommend that you do not use new products for the first time in this treatment, as the combination of physical + chemical exfoliation could easily be too much and cause unexpected reactions. If you’re not confident, go see a professional and have a hydrafacial done to you first to see what your skin can handle and if you like the results.
What you’ll need:
- Oil cleanser/makeup remover/face wipes
- Foaming cleanser
- Physical exfoliation tool of your choice: konjac sponge, peel-off mask, Clarisonic, scrub etc.
- Beta Hydroxy Acid product
- Alpha Hydroxy Acid product
- Pore vacuum (optional)
- Hydrating watery lotion
- Peptide serum
- Sheet mask
- Vaseline/silicone cream
The DIY Hydrafacial steps
- Remove makeup
- Deep cleanse
- Exfoliate (physical)
- Exfoliate (chemical)
- Exfoliate (physical: round two)
- Extractions
- Hydrate
- Seal it in
Step-by-step Hydrafacial at home
Remove makeup
Time: 2 minutes
An oil-based cleansing is the best way to kick off this skin care experience. Just like if you were at the spa, when you’re about to do a deep treatment you don’t wanna skimp and leave behind anything that’ll get smear around later. A cleansing oil will dissolve all the makeup and gunk in your pores and make it much easier to wash away later. Enjoy the process and give yourself a nice massage!
If you’d prefer, you can replace this step with a thorough wipe down with makeup remover, makeup cleansing wipes or a microfibre cloth.
Deep cleanse
Time: 2 minutes
It’s time to get all that cleansing oil/residue and oils away and prep a super clean base or the next step, so that all our acids can have the best chance at working their way into the skin. You can go straight in on top of the cleansing oil with a face wash. Your usual everyday foaming cleanser is fine here. Wash for a little longer than normal, and get right up into the hairline and back to the ears and neck so you don’t miss anywhere. And you’ll replace the moisture you lose shortly, so don’t worry and get lathering!
Exfoliate (physical)
Time: 4 minutes
The key to copying the Hydrafacial is exfoliating with light + repetitive strokes. A large goal of Hydrafacial treatments is to slowly slough off dead skin and reveal a new layer all over. Think of this as the polishing step – the new skin will be nice and smooth and receptive to all our chemical exfoliants and hydrating ingredients . Focus on small areas at a time and really get in there with your tool of choice – be it a cleansing brush or a scrub. I personally always seem to forget the bridge of my nose, corners of my forehead, and cleft of my chin. When you’re done, rinse everything well and lightly pat dry with just your hands.
Exfoliate (chemical)
Time: 5 minutes
Part of the secret of the Hydrafacial is the inclusion of chemical exfoliants in the cleansing/exfoliating step. They’re there to loosen pore debris and old skin cells so they can be washed and scrubbed away. This of it like a laundry booster – it helps everything else work better.
You can recreate their formula at home with an AHA/BHA combination product, or by layering one of each. I highly recommend The Ordinary’s Peeling Solution for having the right ratio and acids. Otherwise, pop on your BHA of choice, followed by an AHA.
Let this settle in for around 5 minutes for gentle acids or as directed on the packaging of stronger acids.
Exfoliate (physical: round two)
Time: 1 minute
To take away all the junk that out chemical exfoliants freed up, we’ll go in one more time with our physical exfoliant. The skin beneath will be maximally refreshed and ready to be hydrated in the next step. Gently revisit the whole face with your product or tool and encourage any more old cells to come loose. Be careful not to overdo it here! When you’re feeling ready, rinse very well and pat dry with a towel.
Extractions
Time: 2 minutes
Now’s the time to to get in there are carefully check your skin for any congestion that’s ready to be removed. If you have a large blackheads (a true blackhead, not sebaceous filaments!) or whitehead waiting to come out, I give you permission to use a tissue and very gently press on either side of it with the pads of your fingers. If it doesn’t come out easily now after all that exfoliation, it’s not going to. Leave it be.
If you have a vacuum-head extractor, now is the perfect time to use it on the oilier areas of your for the true Hydrafacial experience.
Hydrate
Time: 20+ minutes
It’s so important it’s right there in the name: hydration. All this fresh baby skin needs to be pampered and retain its natural moisturised glow.
A hyaluronic glycerin-packed serum should soak right into your new skin, so apply a few layers as needed.
Then, use your peptide-filled serum to recreate the claimed benefits of the original Hydrafacial of anti-ageing and regeneration
I opt to also go in with an essence at this point – which is a slightly more viscous, soothing gel-serum with antioxidant and calming benefits.
Finally, seal the deal with a sheet mask to let your skin marinate in all the juicy goodness. Dr Jart’s Ceramidin mask is my current love. It smells like lemon myrtle and musk and is a jelly-like, delicious skin treat. It’s also clear, so you can do double-duty and get in some time under your LED lamp if you have one. Lay down, relax, and enjoy.
Seal it in
Time: 1 minute
Once you’ve peeled away the mask to reveal hopefully the most hydrated skin you’ve ever had, it’s time to keep it that way. We want to keep it water-based here to stay true to the original treatment. but water loves to evaporate. So, to get the best of both worlds, we’ll finish with an inert occlusive such as vaseline or a silicone cream. It’s a waterproof barrier to lock in the hydration without using with any oils or butters that your skin might react poorly too. I know Vaseline sounds scary, but it really is incredibly safe and helpful for the skin. Trust me, once you see how your face looks you won’t go back. The trick is to use just a very small amount. I scrape the back of my nail in the jar and collect half a pea size amount and once warmed up that’s plenty for my whole face.
Total time: ~40 minutes from start to finish
It’s time to go to bed, and do your best not to touch your face but do it anyway because it feels so damn smooth. There’s nothing I love more than pairing this treatment with a full body shave, a hair mask, new nails, an eyebrow wax and a movie night. I feel practically reborn the next day!
Results after doing a Hydrafacial-inspired routine on myself
I know y’all want to see what my skin looks like before and after my version of the Hydrafacial. Here it is:
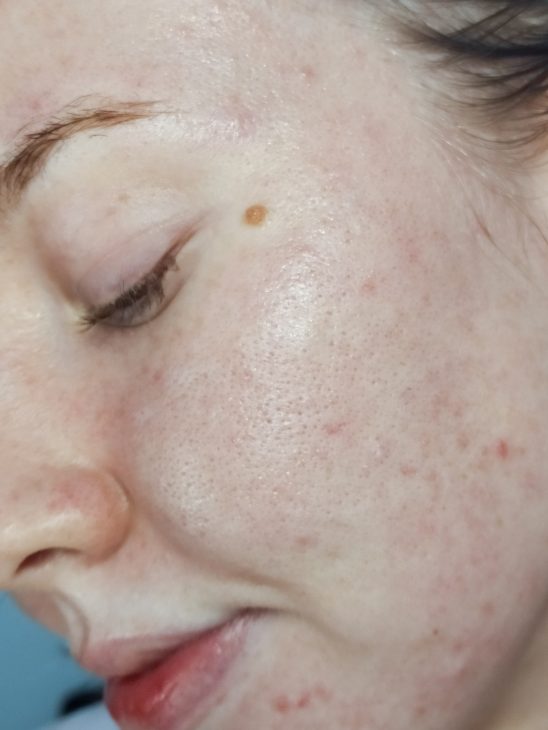
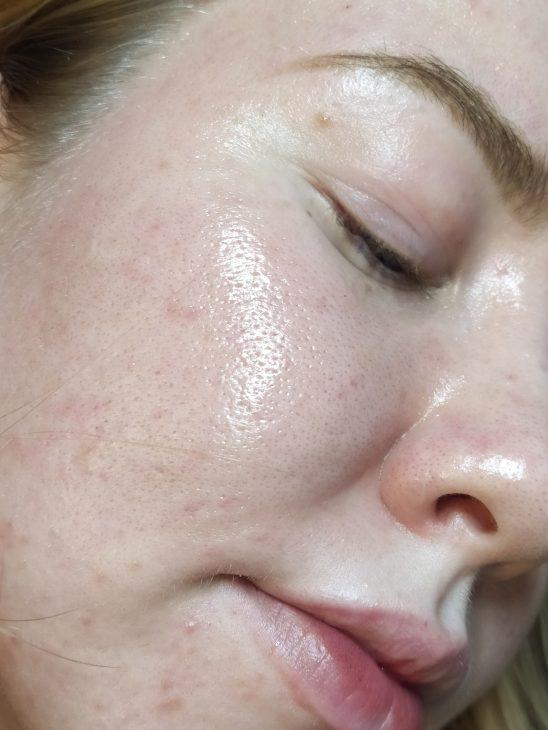
So hydrated and dewy!
If you’re curious to know more about my entire skin care strategy, I’ve actually written a guide on it! There’s 80 interactives pages of step-by-step routines, explanations, science and recommendations to get you started on the right foot. Check it out!

And of course, share your results from my Hydrafacial method with me – I love to see them!


[…] device is great for gentle exfoliation and deep cleaning. As part of a facial (like my at-home Hydrafacial routine), it’s perfect for prepping skin for actives, because it’ll be left super clean and clear. I […]